Here is a comprehensive guide to Xbox controller button names, anatomical layouts, cross-platform translations, and customization options across Xbox generations.
Xbox Controller Button Names and Layout: Complete Guide
Whether you are unboxing your first Xbox Series X|S, setting up PC gaming via Xbox Game Pass, or mapping custom controls for competitive play, understanding your Xbox controller’s layout is essential. Microsoft’s asymmetrical controller ergonomics have set the industry standard for over two decades, but the official names, abbreviations, and hidden button functions can sometimes confuse new and returning players alike.
This guide provides a detailed breakdown of every button, trigger, stick, and port on modern Xbox controllers—including the standard Xbox Wireless Controller and the Xbox Elite Series 2—along with cross-platform naming equivalents (PlayStation and PC) and troubleshooting advice.
Complete Overview of Front-Facing Buttons
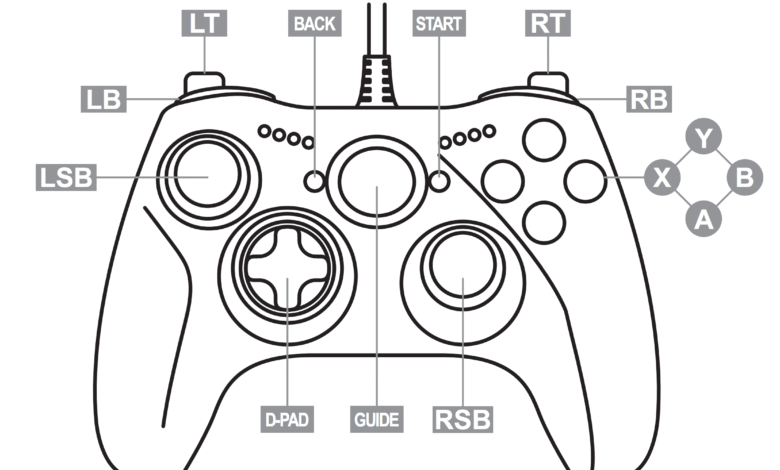
The face of the Xbox controller houses your primary action inputs, movement controls, and systemic navigation keys.
       [ LB ]                          [ RB ]
       [ LT ]                          [ RT ]
    ________________________________________________
   /    (LSB)                                       \
  /    (  1  )              [Xbox]            (A/B)  \
 |                         (  4  )           (X/Y)    |
 |     [D-PAD]       [View] [Share] [Menu]           |
 |      ( 8 )         (3)    (5)     (6)     (LSB)   |
 |                                           (11)    |
  \                                                 /
   \_______________________________________________/
1. The Face Buttons (A, B, X, Y)
Positioned on the upper-right side of the controller face, these four color-coded primary inputs handle the majority of context-sensitive in-game actions:
-
A Button (Green): Primary action button. Used for confirm, jump, interact, or accelerate.
-
B Button (Red): Cancel/back button. Used for crouch, dodge roll, or exiting menus.
-
X Button (Blue): Secondary action button. Used for reload, interact, light attack, or square-equivalent actions.
-
Y Button (Yellow): Tertiary action button. Used for heavy attack, weapon swap, entering vehicles, or triangle-equivalent actions.
2. Left Thumbstick & LSB (Left Stick Button / L3)
Located on the top-left of the controller, the offset Left Thumbstick controls character movement and menu selection.
-
LSB (Left Stick Button): Pushing the thumbstick vertically straight down into the controller casing clicks an internal micro-switch known as LSB (or L3 in multi-platform guides). In most action and shooter titles, pressing LSB triggers Sprint or Run.
3. Right Thumbstick & RSB (Right Stick Button / R3)
Located on the lower-right side (below the face buttons), the offset Right Thumbstick handles camera rotation, aiming, and freelook.
-
RSB (Right Stick Button): Pushing straight down on the right stick activates RSB (or R3). This input is typically bound to Melee attack, Zoom/Toggle Optic, or Lock-on Camera.
4. Hybrid Directional Pad (D-Pad)
Located on the lower-left side, the modern Xbox D-Pad features an 8-way hybrid faceted dish design. It offers discrete directional clicks for cardinal directions (Up, Down, Left, Right) as well as precise diagonal inputs.
-
-
Primary Uses: Inventory hotkeys, weapon wheels, quick-chat commands, or classic 2D fighting game controls.
-
Center Navigation and System Buttons
In the middle column of the controller face sit the system-level menu buttons and streaming controls.
| Button Name | Visual Icon | Primary Function |
| Xbox Button (Guide) | Illuminated Xbox Logo | Powers on the controller/console, opens the Xbox Guide overlay, or returns to the Home Dashboard when tapped. Holding it opens the power menu. |
| View Button | Two overlapping squares | Opens maps, quest logs, scoreboards, or sub-menus inside games. Formerly known as the Back or Select button. |
| Menu Button | Three stacked horizontal lines | Pauses games, opens main options/settings menus, or displays contextual menu choices. Formerly known as the Start button. |
| Share Button | Box with an up arrow | Exclusive to Xbox Series X |
Top Bumper and Trigger Layout
The top edge of the controller features four ergonomic shoulder inputs designed to be operated by your index and middle fingers.
       Front Top View
     _____________________
    /  [ LB ]     [ RB ]  \
   /   [ LT ]     [ RT ]   \
  |_________________________|
Left Bumper (LB) & Right Bumper (RB)
Located on the shoulder edge above the analog triggers, these are crisp digital micro-switches:
-
LB (Left Bumper): Used for switching inventory tabs, throwing secondary grenades, blocking, or aiming special abilities.
-
RB (Right Bumper): Used for light attacks, primary grenades, or cycling right through UI menus.
Left Trigger (LT) & Right Trigger (RT)
Located directly beneath the bumpers, these are deep analog impulse triggers featuring magnetic Hall Effect sensors for precision pressure measurement:
-
LT (Left Trigger): Used for Aiming Down Sights (ADS) in shooters, braking/reverse in driving games, or secondary magic casting.
-
RT (Right Trigger): Used for primary weapon firing, full-throttle acceleration, or heavy physical attacks.
Bottom Ports and Rear Features
The bottom edge and underside of the controller manage connectivity, accessories, and audio devices.
-
3.5mm Audio Jack: Centered on the bottom edge. Accepts standard TRRS headsets for stereo audio and voice chat microphone input.
-
Expansion Port: Located directly next to the 3.5mm jack. Connects legacy accessories like the Xbox One Chatpad or official Headset Adapters.
-
Pairing / Sync Button: Located on the top edge near the USB-C port. Used to initiate Bluetooth and Xbox Wireless pairing modes with consoles, PCs, or mobile devices.
-
USB-C Port: Located at the top center. Provides wired connectivity and battery charging for rechargeable packs.
Xbox Button Translation Chart (Xbox vs. PlayStation vs. PC)
Multi-platform games and PC games often display prompt icons based on different controller standards. Use this quick translation key to map inputs across platforms:
| Xbox Input | Abbreviation | PlayStation Equivalent | Generic PC / DirectInput |
| A Button | A | Cross ($\times$) | Button 1 |
| B Button | B | Circle ($\bigcirc$) | Button 2 |
| X Button | X | Square ($\square$) | Button 3 |
| Y Button | Y | Triangle ($\triangle$) | Button 4 |
| Left Bumper | LB | L1 | Button 5 |
| Right Bumper | RB | R1 | Button 6 |
| Left Trigger | LT | L2 | Z-Axis (-) |
| Right Trigger | RT | R2 | Z-Axis (+) |
| Left Stick Click | LSB | L3 | Button 9 |
| Right Stick Click | RSB | R3 | Button 10 |
| View Button | View | Touchpad Click / Share | Select / Back |
| Menu Button | Menu | Options | Start |
Advanced Layout: Xbox Elite Series 2 Features
For competitive gamers, the Xbox Elite Wireless Controller Series 2 introduces additional inputs and physical hardware adjustments on the rear and top chassis:
1. Rear Paddles (P1, P2, P3, P4)
Four removable stainless-steel paddles attach to the back shell:
-
Top Left Paddle (P1) & Top Right Paddle (P2)
-
Bottom Left Paddle (P3) & Bottom Right Paddle (P4)
Benefit: Players can map face buttons (A, B, X, Y) or stick clicks (LSB, RSB) to these rear paddles, allowing them to jump, reload, or crouch without taking their thumb off the right aiming stick.
2. Hair Trigger Locks
Three-stage mechanical switches located on the back panel allow you to physically limit the travel distance of the LT and RT triggers for faster hair-trigger firing in first-person shooters.
3. Tension-Adjustable Thumbsticks
Using an included adjustment tool, the mechanical resistance of both the left and right analog sticks can be tightened or loosened across three distinct tension settings.
How to Remap Xbox Controller Buttons
If a game does not offer your preferred control scheme, you can reassign any button at the system level on Xbox consoles or Windows PCs:
-
Open the Xbox Accessories App on your Xbox console or Windows PC.
-
Select your connected controller and click Configure.
-
Choose New Profile to create a custom keymap.
-
Select any button from the drop-down menu (e.g., LB) and reassign it to another target button (e.g., RSB).
-
Save your profile. Elite controllers allow saving up to 3 custom profiles directly on the internal memory chip, switchable via the Profile button on the front face.